Tuesday, March 22, 2011

Saturday, March 19, 2011

Wednesday, March 16, 2011


How To : Add 3 Column at bottom Blogger?
We are going to add some columns to our Blogger Footer. If you're using one of the Blogger default templates, you've noticed that in your Footer section, you only have a horizontal Add a Gadget element that has the same width like the Blog.

We can do better. Let's start with adding 3 columns in the footer, and place the default one on the bottom.

Advantages:
► you can place more widgets (gadgets)
► rearrange them as you want
► your main content area will load faster if you place your "biggest" widgets on the bottom
Ok, let's do this. This time, you'll just have to Copy-Paste. It's a 7 min job. Before you begin, do back up your template (1 minute).
1. If you already have some widgets (gadgets) in the Footer, remove them:
LAYOUT ► check if you have gadgets in the footer ► if you do, click on Edit and ► Remove
or, just "drag" them in the Sidebar. You'll get them back in place when you integrate the Footer columns.
2. Go to LAYOUT ► EDIT HTML ► and locate the following part of the code:
]]>
..ABOVE it, you'll have to place the following part of the code:
#footer-columns {
border-top:1px dotted #999999;
clear:both;
margin:0 auto;
}
.column1 {
padding: 0px 5px 3px 5px;
width: 30%;
float: left;
margin:3px;
text-align: left;
}
.column2 {
padding: 0px 5px 3px 5px;
width: 31%;
float: left;
margin:3px 3px 3px 5px;
text-align: left;
}
.column3 {
padding: 0px 5px 3px 5px;
width: 30%;
float: right;
margin:3px;
text-align: left;
}
.addwidget {
padding: 0 0 0 0;
}
#footer-columns ul {
list-style:none;
margin:0 0 0;
padding:0 0 0;
}
#footer-columns li {
margin:0;
padding-top:0;
padding-left:0;
padding-bottom:.25em;
padding-right:15px;
text-indent:-15px;
line-height:1.5em;
}
body#layout #footer-columns {
width: 100%;
margin-left: auto;
margin-right: auto;
}
body#layout .column1 {
width: 32%;
float: left;
}
body#layout .column2 {
width: 32%;
float: left;
}
body#layout .column3 {
width: 32%;
float: right;
}
...that's the CSS style for our new Footer section. We'll talk about customization (colors, borders, backgrounds, headings...) in the other tutorial.
3. Now, to add some containers. In your LAYOUT ► EDIT HTML ► locate this part:
...you will DELETE it, and REPLACE with this code:
...Save template.
Basically, that's it. It works for the templates with different width, because the columns are fluid (made to stretch to fit the footer-container width).
Some margin adjustments may be necessary for the wider templates.
Next time is a fun part - customization.
Basically, that's it. It works for the templates with different width, because the columns are fluid (made to stretch to fit the footer-container width).
Some margin adjustments may be necessary for the wider templates.
Next time is a fun part - customization.
How To : Add another "Add Gadget" to Blogger?
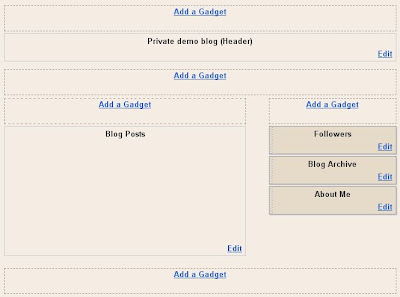
The standard 2 column Blogger template have only 3 ADD A GADGET (page element) as shown in the screen shot below:

It is useful to have extra ADD A GADGETs in the blog Header, below the blog Header and in the main column as shown in the screen shot below:
Examples what I use them for is the Google custom search at the top of the main column and the AdSense link units below this blog title. A blogger also wanted to add a Marquee like the one above the blog title in the demo blog. This can be done by adding extra ADD A GADGET. To do this, go to LAYOUT, click EDIT HTML. This will take you to the template editor. Look for showaddelement. Change showaddelement='no' to showaddelement='yes'. If there is a a maxwidgets='1' in front of the showaddelement. Change it to maxwidgets='2' or more or even leave it as maxwidgets='' (unlimited number). If you have problem looking for the above, press ctrl+F and search.
The above (searchbox, ad unit, marquee) were added using a HTML/Javascript gadget. Whatever you add can be dragged to any sections of your blog using your mouse.
Tuesday, March 15, 2011
How To : Speed Up Facebook
Assalamualaikum..semenjak dua menjak nie facebook korang macam lembap sikit kan?jom try cara nie..aku da try..memang ada penambahan kelajuan di facebook..

If you are having difficulty accessing facebook, this solution might work for you. Affected users only.
Why? this is because it is most likely caused by one of the hop servers at “facebook-10G.hkix.net [202.40.161.110]” which located at Hong Kong Internet Exchange.
1.0 Solution
I found a temporary solution to fix the speed issue with facebook.WARNING: YOU NEED ADMINISTRATIVE ACCESS TO DO THIS!
All you need to do is just do the following:
If you have UAC turned on, kindly turn it off.
1.1 Windows User:
- Go to
C:\Windows\System32\drivers\etc\ - Open hosts file with notepad.exe
- Add the following:
203.106.85.66 www.facebook.com - Save.
- Open your browser, key in www.facebook.com.
- Enjoy the superfast speed!
# Copyright (c) 1993-2009 Microsoft Corp.

#

# This is a sample HOSTS file used by Microsoft TCP/IP for Windows.

#

# This file contains the mappings of IP addresses to host names. Each

# entry should be kept on an individual line. The IP address should

# be placed in the first column followed by the corresponding host name.

# The IP address and the host name should be separated by at least one

# space.

#

# Additionally, comments (such as these) may be inserted on individual

# lines or following the machine name denoted by a '#' symbol.

#

# For example:

#

#      102.54.94.97     rhino.acme.com          # source server

#       38.25.63.10     x.acme.com              # x client host

# localhost name resolution is handled within DNS itself.

# 127.0.0.1       localhost

# ::1             localhost

203.106.85.66 www.facebook.com
1.1.1 How to Edit Hosts File
Open with notepad.If you are getting errors…
Windows 7, if you are getting errors, go to Start –> Control Panel –> User Accounts
Click Change User Account Control Settings
Set to Never Notify.
Save Settings and Restart PC. Then you should be able to edit your hosts file.
Windows XP, open notepad, copy paste the above text on how hosts should look like. Save as, remove the change the Text Document to all files. Save without the .txt. Delete the current hosts file and overwrite with a newly created one.
1.2 Linux/Ubuntu User:
- Go to Application –> Accessories –> Terminal
- key in the following:
sudo gedit /etc/hosts - Under 127.0.1.1
, input the following:
203.106.85.66 www.facebook.com - Click Save
- Close gedit and terminal.
- Open your browser, key in www.facebook.com.
- Enjoy the superfast speed!

Terminal Command
Your hosts should look like this:
 127.0.0.1 localhost.localdomain localhost

::1 localhost6.localdomain6 localhost6

127.0.1.1 HeHe-Haxor

203.106.85.66 www.facebook.com
# The following lines are desirable for IPv6 capable hosts
::1 localhost ip6-localhost ip6-loopback
fe00::0 ip6-localnet
ff00::0 ip6-mcastprefix
ff02::1 ip6-allnodes
ff02::2 ip6-allrouters
ff02::3 ip6-allhosts2.0 Difference in ping
How to ping? Go to start –> Run –> cmdThen key in “ping (url address)” without the “”
2.1 BEFORE:
C:\Users\HeHeHunter>ping www.facebook.comPinging facebook.com [69.63.189.16] with 32 bytes of data:
Reply from 69.63.189.16: bytes=32 time=403ms TTL=246
Reply from 69.63.189.16: bytes=32 time=398ms TTL=246
Request timed out.
Reply from 69.63.189.16: bytes=32 time=396ms TTL=246Ping statistics for 69.63.189.16:
Packets: Sent = 4, Received = 3, Lost = 1 (25% loss),
Approximate round trip times in milli-seconds:
Minimum = 396ms, Maximum = 403ms, Average = 399ms2.2 AFTER:
C:\Users\HeHeHunter>ping www.facebook.comPinging www.facebook.com [203.106.85.66] with 32 bytes of data:
Reply from 203.106.85.66: bytes=32 time=13ms TTL=60
Reply from 203.106.85.66: bytes=32 time=15ms TTL=60
Reply from 203.106.85.66: bytes=32 time=12ms TTL=60
Reply from 203.106.85.66: bytes=32 time=20ms TTL=60Ping statistics for 203.106.85.66:
Packets: Sent = 4, Received = 4, Lost = 0 (0% loss),
Approximate round trip times in milli-seconds:
Minimum = 12ms, Maximum = 20ms, Average = 15ms3.0 PingPlotter Statistics
3.1 BEFORE:
Ping Plotter Before Hack

Ping Plotter After Hack